Understanding the GraphQL Type System

Introduction

GraphQL is a modern solution for facilitating the communication between a front end and a data source. All of the details and capabilities of a GraphQL implementation are laid out in the GraphQL Schema. In order to write a functioning GraphQL schema, you must understand the GraphQL Type System.

In this article, you will learn about GraphQL types: the five built-in scalar types, Enums, the List and Non-Null wrapping types, Object types, and the abstract Interface and Union types that work alongside them. You will review examples for each type and learn how to use them to build a complete GraphQL schema.

Prerequisites

To get the most out of this tutorial, you should have:

  • An understanding of the fundamental concepts of GraphQL, which are laid out in An Introduction to GraphQL.
  • A GraphQL environment

Scalar Types

All the data in a GraphQL schema ultimately resolve to various scalar types, which represent primitive values. GraphQL responses can be represented as a tree, and the scalar types are the leaves at the ends of the tree. There can be many levels in a nested response, but the last level will always resolve to a scalar (or Enum) type. GraphQL comes with five built-in scalar types: Int, Float, String, Boolean, and ID.

Int
Int is a signed 32-bit non-fractional numerical value. It is a signed (positive or negative) integer that does not include decimals. The maximum value of a signed 32-bit integer is 2,147,483,647. This is one of the two built-in scalars used for numerical data.

Float
A Float is a signed double-precision fractional value. It is a signed (positive or negative) number that contains a decimal point, such as 1.2. This is the other built-in scalar used for numerical data.

String
A String is a UTF-8 character sequence. The String type is used for any textual data. This can also include data like very large numbers. Most custom scalars will be types of string data.

Boolean
A Boolean is a true or false value.

ID
An ID is a unique identifier. This value is always serialized as a string, even if the ID is numerical. An ID type might be commonly represented with a Universally Unique Identifier (UUID).

Custom Scalars
In addition to these built-in scalars, the scalar keyword can be used to define a custom scalar. You can use custom scalars to create types that have additional server-level validation, such as Date, Time, or Url. The server will know how to handle interactions with this new type using the GraphQLScalarType.

Enum Type

The Enum type, also known as an Enumerator type, describes a set of possible values.

Using the Fantasy Game API theme from other tutorials in the series, you might make an enum for the game characters' Job and Species with all the values the system will accept for them. An Enum is defined with the enum keyword, like so:

enumTypeExample1

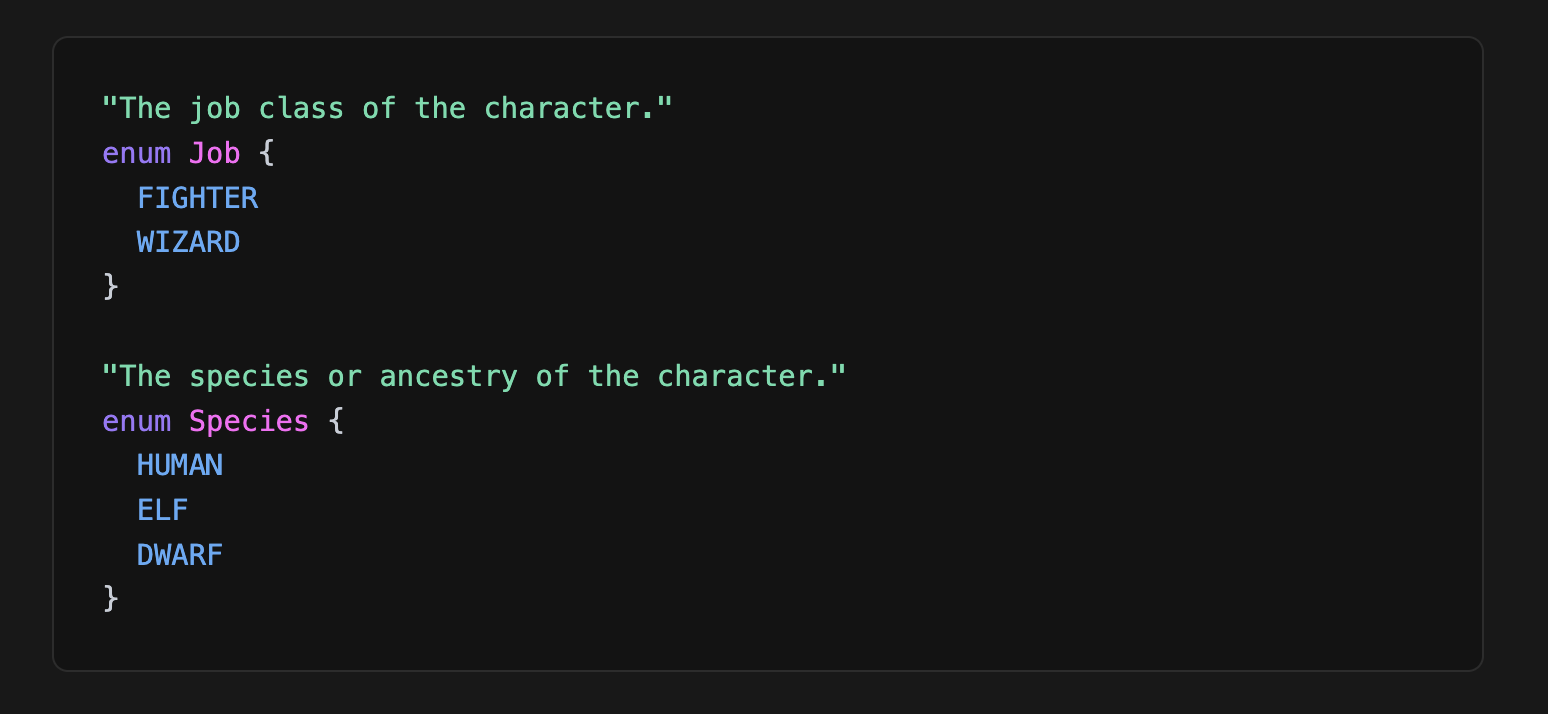
In this way, it is guaranteed that the Job of a character is FIGHTER or WIZARD and can never accidentally be "purple" or some other random string, which could be possible if you used a String type instead of making a custom Enum. Enums are written in all-caps by convention.

Enums can also be used as the accepted values in arguments. For example, you might make a Hand enum to denote whether a weapon is single-handed (like a short sword) or double-handed (like a heavy axe), and use that to determine whether one or two can be equipped:

enumTypeExample2

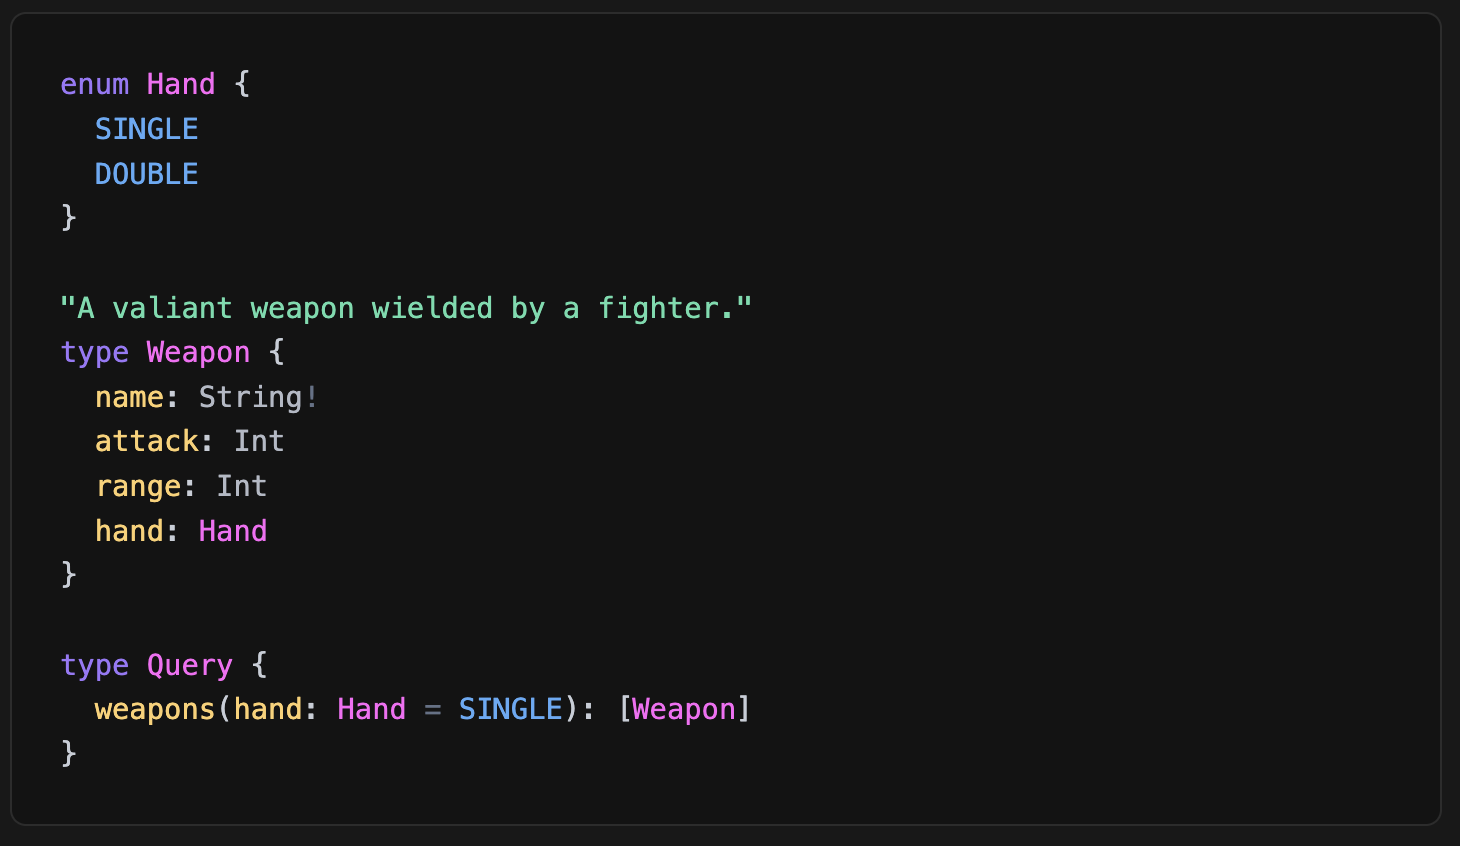
The Hand enum has been declared with SINGLE and DOUBLE as values, and the argument on the weapons field has a default value of SINGLE, meaning if no argument is passed then it will fall back to SINGLE.

Conclusion

In this tutorial, you learned about many of the types that define the GraphQL type system. The most fundamental types are the scalar types, which are the values that act as the leaves on the schema tree, and consist of Int, Float, String, Boolean, ID, and any custom scalar that a GraphQL implementation decides to create. Enums are lists of valid constant values that can be used when you need more control over a response than simply declaring it as a String, and are also leaves on the schema tree. List and Non-Null types are known as type modifiers, or wrapping types, and they can define other types as collections or required, respectively. Objects are the branches of the schema tree, and almost everything in a GraphQL schema is a type of Object, including the query, mutation, and subscription entrypoints. Interface and Union types are abstract types that can be helpful in defining Objects.

For further learning, you can practice creating and modifying a GraphQL schema by reading the How to Set Up a GraphQL API Server in Node.js tutorial to have a working GraphQL server environment.

I hope you enjoyed the article.

See you in the next post.

Have a great day!

Keep It Simple, Stupid

Today, we're going to talk about the KISS principle in JavaScript.

It's all about simplifying your JavaScript code. You:

  • reduce bugs
  • enhance readability
  • improve maintainability

You will save time and effort in the long run. Many devs struggle with overly complex code, leading to confusion and errors. Embracing simplicity prevents these pitfalls and streamlines your development process.

Keep It Simple, Stupid = Simplicity = Smoother Development & Easier Maintenance

Keep the code easy to read and understand. If you keep the code simple, you'll make it easier for all people to fix things when they go wrong.

Don’t make your code too smart.

Make it simple. You and your teammates will thank you in the future when maintaining the code or adding new features.

Here are some simple code examples to see how to apply this principle:

Arrow Functions

parentFunction

Short-Circuit Evaluation

parentFunction

Implicit Return

parentFunction

Default Parameters

parentFunction

Simple functions

parentFunction

Destructuring

parentFunction

Spread Operator

parentFunction

Conclusion

Embracing the KISS principle in your JavaScript coding practices can significantly improve your productivity and code quality. By keeping it simple, you'll write better code and make your development process more enjoyable and efficient.

So, next time you're tempted to overcomplicate things… Remember: Keep It Simple!

I hope you enjoyed the article.

See you in the next post.

Have a great day!

Testing in Front-End Development

Today, we'll delve into the importance of testing in front-end development and showcase 3 types of testing we can use in projects.

Testing in front-end development ensures code reliability, catches bugs early, and boosts confidence in deployments, ultimately enhancing the user experience and developer productivity.

Many developers overlook testing in front-end development, leading to increased debugging time, higher chances of bugs in production, and a compromised user experience.

Front-end testing isn't just an extra step. It's fundamental to delivering high-quality web applications that meet user expectations and maintain code integrity.

  • Increased code reliability and stability

  • Early detection and prevention of bugs

  • Improved developer confidence and productivity

Examining our application to ensure it functions correctly is crucial. We must ensure no errors slip through when we release our product.

Conducting manual tests demands significant time and energy to uncover issues. Hence, automating our tests is imperative.

Diverse test categories exist:

• Unit tests

• Integration tests

• End-to-end tests

Unit testing

These tests focus solely on independently examining the smallest components of our application.

I recommend using Jest, which is recognized as the predominant framework for evaluating JavaScript applications.

Integration testing

Integration testing involves examining how various application components function together. These tests are more significant than unit tests. Most application evaluations lean towards integration tests.

The value of integration tests lies in their ability to instill confidence in our application. By scrutinizing the functionality of diverse parts, assessing their relationships, and gauging communication pathways, these tests offer a comprehensive understanding of the system's performance.

I recommend using Jest and the React Testing Library to execute integration testing. This methodology ensures that we evaluate application features in a manner that mirrors user interaction, facilitating a thorough examination of functionality.

End-to-end testing

These tests allow us to scrutinize vital segments of our application from start to finish, ensuring seamless functionality throughout. Typically, such tests prioritize examining critical features comprehensively.

End-to-end testing entails evaluating the application as a cohesive whole, encompassing both front-end and back-end components. Typically, these tests involve automating the entire application and ensuring seamless functionality across the system.

In end-to-end testing, our primary focus is on the "happy path," verifying that the application performs as anticipated under ideal conditions.

I recommend using Cypress, a widely used testing framework that executes tests within a headless browser environment. This indicates that the tests will run within an authentic browser environment.

Conclusion

Embracing testing in front-end development is crucial for delivering high-quality web applications that meet user expectations and maintain code integrity. By integrating testing into your development workflow, you can ensure code reliability, catch bugs early, and boost developer productivity.

I hope you enjoyed the article.

See you in the next post.

Have a great day!

useMemo in React

I'm excited to dive deep into the concept of useMemo, a powerful React hook that can help improve the performance of your application. useMemo is a tool that allows you to memoize, or cache, the results of expensive calculations, reducing the need for unnecessary re-computations and enhancing your app's responsiveness.

Understanding the mechanics and applications of useMemo is crucial for React developers seeking to optimize their applications. Avoiding unnecessary recalculations can make your app more responsive and resource-efficient, significantly enhancing the user experience.

Many React developers struggle with the use of useMemo, either overusing or misapplying it when it's not necessary. This can lead to increased complexity without the desired performance benefits.

Understand the fundamental

useMemo enables you to cache the result of computations between re-renders. This is particularly useful when dealing with expensive computations whose output is determined by specific dependencies. When the dependencies don't change between re-renders, the result will be cached, saving processing time and resources.

  • useMemo is very important for optimizing React components render.
  • It work by memorizing the output of function with dependencies.
  • Overuse and misapplying this can lead complexity without best page performance.
  • Ideal for expensive calculation that do not change too often.

When to use

  • For heavy calculations in render methods.
  • When the props of children require expensive calculations.

Understand the dependency

Dependencies are crucial in useMemo. They determine when the cached output of a calculation should be used or when a new calculation should be performed. Mismanaging dependencies can lead to frequent, unnecessary recalculations.

Common misunderstanding

  • useMemo isn't a common silver bullet for all performance issues
  • It should not used to fix issues that have poor structure design

Example

Considering TodoList component where filtering todos is an expensive operation. Using useMemo can cache the result of filtering todoList:

useMemo example

Conclusion

useMemo is a powerful tool in React development for optimizing application performance. When used correctly, it can effectively reduce unnecessary computations, leading to a smoother and faster app. Remember, the real power of useMemo lies in understanding when and where to use it. You must thoughtfully apply it in your React applications.

If you're still not fully clear on useMemo, I highly recommend reading the official React documentation:: https://react.dev/reference/react/useMemo

I hope you enjoyed the article. If you have any questions, feel free to reply to my email or leave a comment in the post. You can also contact me in Linkedin.

See you in the next post.

Mastering Front-End Development

Mastering Front-End Development: Navigating the Complexities and Seizing Opportunities

Learning new things in the ever-evolving world of front-end development can be challenging. With a vast array of tools, skills, techniques, and the rise of AI, it's easy to feel overwhelmed. However, by embracing the complexities and focusing on the opportunities, we can shape the digital landscape with creativity and innovation.

Mastering front-end development is essential for creating engaging and functional web applications that provide a seamless user experience across various devices and browsers. Many people struggle with front-end development due to the attention to detail and specialized knowledge required in coding and design. Common pain points include lack of consistency, performance issues, and difficulties in feature development

Instead of thinking about many difficult in front-end development, why we don't take a look on opportunity for creative and innovative in shaping the digital landscape

Front-end development requires technical expertise, creativity, and attention to detail. Building responsive designs, ensuring cross-browser compatibility, and optimizing performance demand rigorous discipline and continuous learning.

  • You must understand how challenge front-end development are, including responsive design and cross-browser compatibility.
  • Develop strong discipline and consistency in coding practices.
  • Priority on performance for enhance user experiences.
  • Always engage to learn new things, your knowledge will be outdate soon.

Some challenges you need to know soon and overcome it

Instead of dwelling on the difficulties, let's explore the opportunities that front-end development presents. By understanding the challenges and developing strategies to overcome them, we can unleash our creativity and make a meaningful impact on the digital world.

Key Challenges and Strategies:
1.Responsive Design: Utilize CSS media queries and flexible layouts to create designs that adapt to various screen sizes. This ensures a consistent and optimized user experience across devices.
2.Cross-Browser Compatibility: Test your code across browsers and devices to ensure consistent rendering and functionality. This step is crucial for delivering a seamless experience to your users.
3.Performance Optimization: Minimize file sizes, reduce HTTP requests, and utilize techniques like lazy loading to improve page load times. Optimizing performance enhances user satisfaction and engagement.
4.Feature Implementation: Break down complex features into smaller tasks and leverage frameworks like React or Vue.js for efficient development. This approach helps manage the complexity of front-end development and streamlines the implementation process.

Conclusion

Front-end development is undoubtedly challenging, but it also presents immense opportunities for growth and innovation. By cultivating strong discipline, consistency, and a belief in yourself, you can overcome the obstacles and master the art of front-end development.

Trust the process, make a plan, and follow through. With dedication and a willingness to learn, you can transform the digital landscape and create experiences that captivate your users.

Remember, front-end development is hard, but it's a journey worth embarking on. Embrace the challenges, seize the opportunities, and unleash your creativity to shape the future of the web.

I hope you enjoyed the article.

If you have any questions, feel free to reply to the email or leave a comment in the post. You can also contact me on LinkedIn.

See you in the next post.